User Guides › GPS field guide: Survey (Beta)
GPS field guide: Survey (Beta)
For the office: projects, imports, COGO, exports and file prep, OPUS and the office checklist. Field work is on the phone.
Contents
1 · What the Survey tab does
Survey (Beta) is a pop-out panel on the ScoutTract map. It turns an RTK GNSS receiver plus your Android phone into a light data collector. You can:
- collect averaged points;
- stake out points and lines;
- run COGO;
- move files to and from Emlid Flow, Trimble Access and CAD;
- prepare OPUS static submissions and turn the emailed solution into a control point.
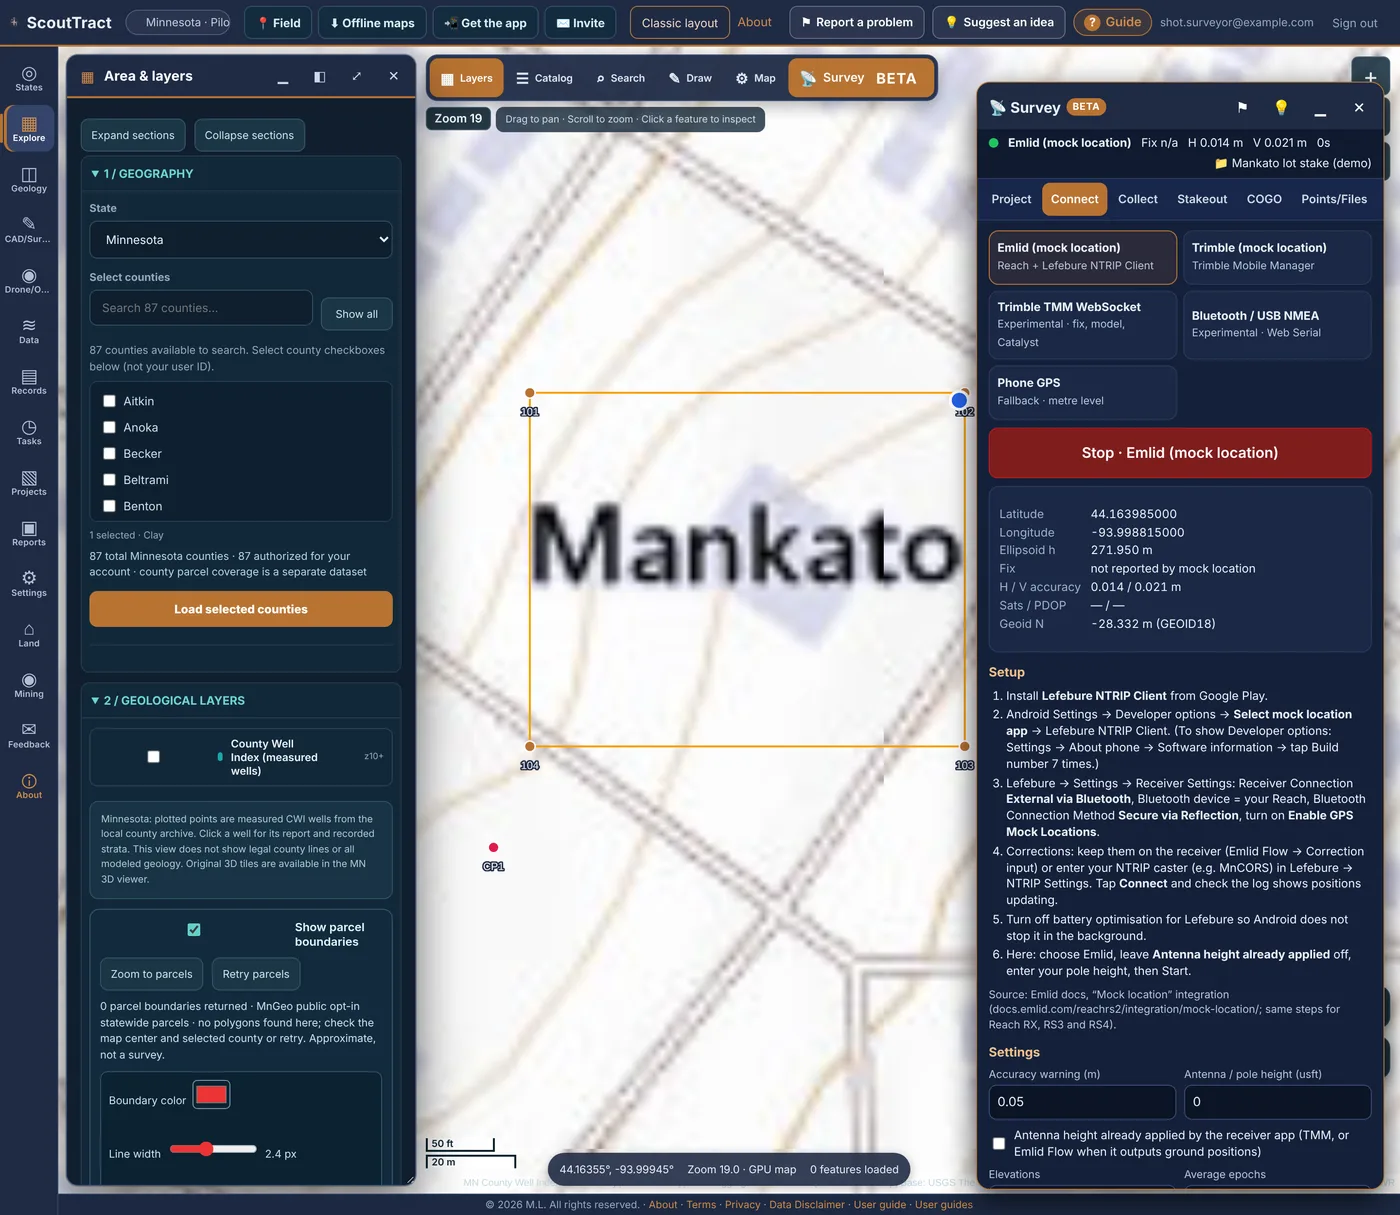
To open it: sign in, then click 📡 Survey Beta in the map bar. Or add #survey to the address. The panel opens on the right of the map.
- set up projects;
- import stake targets and control;
- run COGO;
- export files for Emlid Flow, Trimble Access and CAD;
- prepare OPUS submissions.
The panel's tabs: Project · Connect · Collect · Stakeout · COGO · Points/Files · OPUS · Help.
The header buttons:
- ⚑: report a problem.
- 💡: suggest an improvement.
- ▁: minimise the panel.
- ✕: close the panel.
Your projects and points are private to your account.
The first time you open it, a Survey is in Beta card appears. Click Got it to close it.
Beta: Check into a known control point before you rely on results. ScoutTract does not replace your field software's QA or a licensed surveyor's judgement.
The status bar (always visible)
The status bar shows:
- a coloured dot;
- the source, or Not connected;
- the fix, or Fix n/a;
- H and V accuracy in metres;
- satellites and PDOP, when the source reports them;
- the age of the last position in seconds;
- 📁 and the open project.
| Dot | Meaning |
|---|---|
| green | Horizontal accuracy is at or under your limit (default 0.05 m). The fix is RTK fixed, or the source doesn't report a fix. |
| amber | Accuracy is within 4× the limit, or the source doesn't report accuracy. Also amber for a fix that isn't RTK fixed (e.g. float) but whose accuracy is within the limit. |
| red | Accuracy is worse than 4× the limit. Also red for a non-fixed solution whose accuracy is worse than the limit. |
A warning line appears under the bar in these cases:
- "No position for N s — check the receiver connection." No position has arrived for more than 5 s.
- "Accuracy X m is worse than your 0.05 m limit — not survey grade."
- "Fix is RTK float — wait for RTK fixed."
- "Accuracy not reported by this source — verify on a known point."
- "Fix status unknown — confirm FIX in Lefebure/TMM." Mock location doesn't carry the fix type (see section 5).
- "Choose your receiver model on the Connect tab so the antenna phase-centre offset is right."
2 · What you need
- An Android phone or tablet with ScoutTract open in Chrome or the installed app. Mock location is an Android feature.
- One of these receivers:
- an Emlid Reach (RS2/RS2+, RS3, RS4, RX) with Emlid Flow and the Lefebure NTRIP Client app;
- a Trimble receiver (R2, R8s, R10, R12i, R580, R780, Catalyst DA2) with Trimble Mobile Manager (TMM).
- RTK corrections. These come from an NTRIP network such as MnCORS (NAD83(2011)), your own base or Trimble RTX/VRS.
- A project in the State Plane zone and units you'll deliver in.
Tip: Only one app can be Android's mock-location app at a time: Lefebure or TMM. Switch it in Developer options when you change receivers.
3 · Field work is on your phone
Connecting a receiver, checking the fix, collecting and stakeout all use the receiver's position. ScoutTract gets that position from Android mock location, which only exists on an Android phone or tablet:
The Mobile edition covers:
- Emlid Reach and Trimble setup;
- the Connect settings, FIX/float and antenna height;
- checking in on a known point;
- Collect and Stakeout;
- the field checklist.
What still matters on the computer
- Coordinate system and units. Pick the zone and units you'll deliver in. The phone, Emlid Flow or Trimble Access, and your CAD must all match.
- Elevations (Connect tab). Choose Orthometric NAVD88 (GEOID18) or Ellipsoidal. This setting is saved per browser, so set it again on the phone.
- Bluetooth / USB NMEA (experimental). Chrome on a computer can read a receiver's NMEA through Web Serial. It shows the real fix type. It's meant for testing, not field work.
Antenna height: on the phone, pick the Receiver model and enter the pole height to the bottom of the receiver. For Emlid Reach, ScoutTract adds the NGS antenna phase-centre offset, e.g. 0.1349 m for RS2/RS2+/RS3 [14]. For Trimble via TMM it adds none. Check in on a known point before you rely on results. The Mobile edition explains this.
4 · Projects and importing
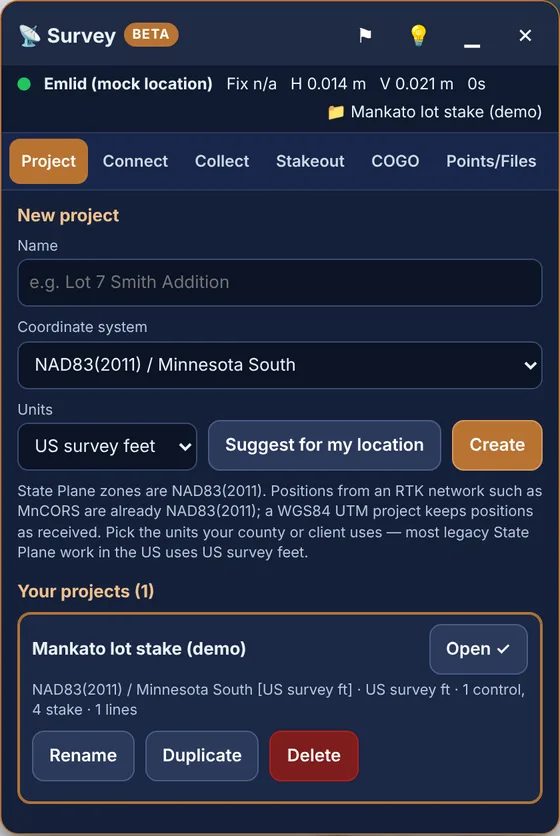
- Go to Project → New project and type a Name (e.g. "Lot 7 Smith Addition").
- Choose the Coordinate system. Suggest for my location fills the "Suggested here" list. State Plane zones are NAD83(2011), the same as MnCORS.
- Choose Units: US survey feet, International feet or Metres. Then tap Create.
- Use the computer for this: the full keyboard makes long names and zone searches easier.
- Under Your projects you can Open, Rename, Duplicate or Delete a project. To delete, you must type the project name.
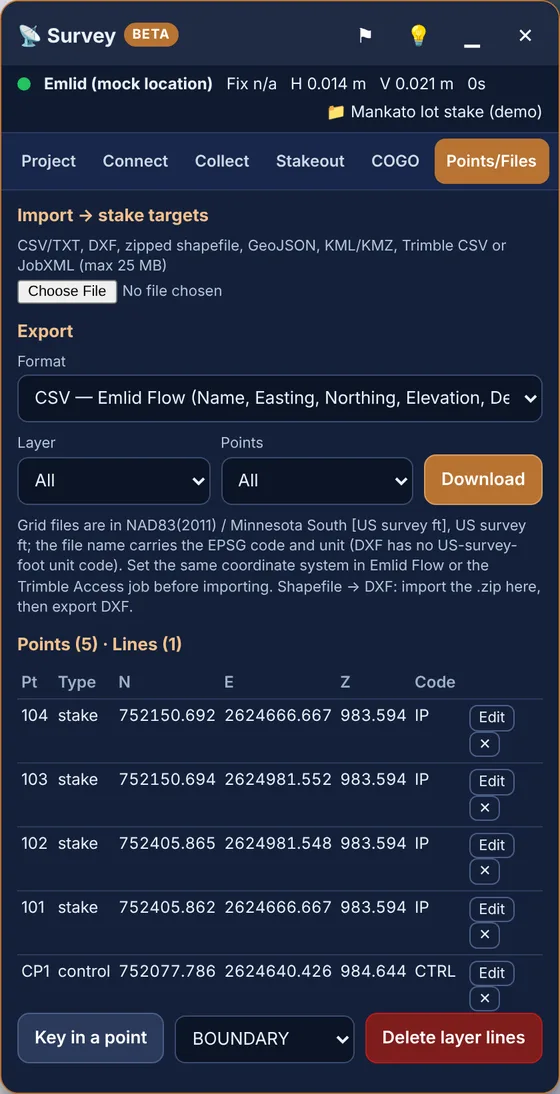
Import (Points/Files → Import → stake targets)
Choose the file. ScoutTract shows Detected: with the file type, then the options for that type.
Formats: CSV/TXT, DXF, zipped shapefile, GeoJSON, KML/KMZ, and Trimble CSV or JobXML, up to 25 MB.
CSV options:
- Layout: Auto (header names), PNEZD, PENZD, or Use the column mapping below.
- Coordinates: Grid N/E (project system) or Latitude / longitude.
- File units.
DXF options: DXF units.
Shapefile: must be zipped with its .prj. It's reprojected from the .prj.
Settings for every import:
- Import as: Stake targets, Control or Measured.
- Layer.
- Duplicate names: Rename (adds _1), Skip or Replace.
Then click Import. DXF coordinates are read as grid coordinates in the project system.
To add a single point, use Key in a point under the point list.
5 · COGO
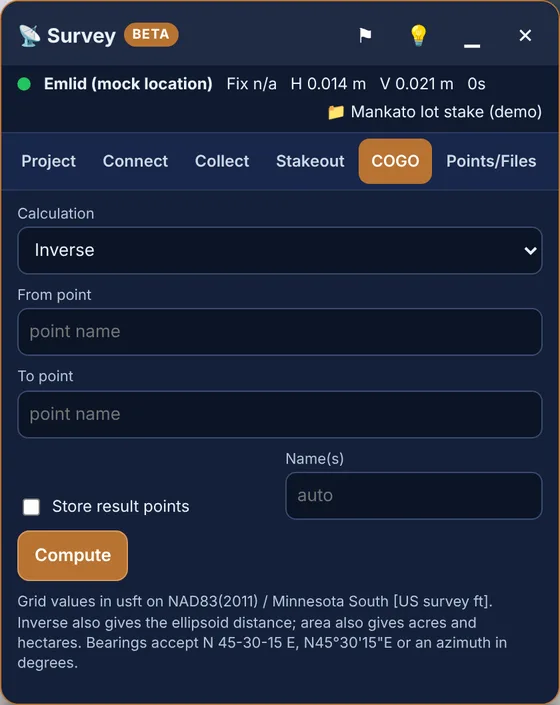
Calculations available:
- Inverse: bearing, azimuth, grid and ellipsoid distance, dN/dE, dZ, slope and grade.
- Forward (bearing & distance).
- Traverse: one "bearing, distance" leg per line, with optional Close to point. Gives the misclosure and precision.
- Intersections: bearing–bearing, distance–distance and bearing–distance.
- Station / offset of a point.
- Point at station / offset.
- Area & perimeter: square units, acres, hectares and ellipsoid area.
To store results: tick Store result points and set Name(s) (default "auto"). Then click Compute.
Tip: Key in record traverses on the computer before the field day. Store the computed corners, then stake them on the phone. They're in the same project.
Bearing formats accepted:
N 45-30-15 E;N45°30'15"E;- an azimuth in degrees.
6 · Exports and loading into Emlid Flow / Trimble
Go to Points/Files → Export. You can filter by Layer and Points (All, Measured + control, Stake, As-staked or COGO), then tap Download. The file name includes the EPSG code and units.
| Format in ScoutTract | Use it for |
|---|---|
| CSV — Emlid Flow | Emlid Flow CSV import. The header is Point,Easting,Northing,Elevation,Description,Code. Flow needs Point, Easting, Northing and Elevation headers [5]. |
| CSV — PNEZD (Trimble Access, Carlson, Civil 3D) · CSV — PENZD | Emlid Flow PNEZD/PENZD (no header) [5], Carlson, Civil 3D. |
| CSV — P,N,E,Z,Code (Trimble Access) | A Trimble Access CSV linked file. The job's Coordinate order must match [12]. |
| DXF (points, labels, linework) | CAD. Emlid Flow "DXF as geometries" [5]. Trimble Access DXF [12]. |
| Shapefile .zip with .prj | GIS. Emlid Flow shapefile (ZIP with .shp/.shx/.dbf) [5]. Trimble Access .shp [12]. |
| KML (Google Earth) | Google Earth, Emlid Flow, Trimble Access (WGS 84) [12]. |
| Trimble JobXML .jxl (experimental) | Trimble office software. Test it before relying on it. |
| CSV — full / Stake report CSV / Check-in report CSV | Records: fix, accuracy, lat/lon, stake deltas and check-in results. |
Getting files to the field
- Staking with ScoutTract on the phone: nothing to copy. Import on the computer, then open the same project on the phone.
- Staking with Emlid Flow or Trimble Access: Download the export and copy it to the controller or phone. Email, Drive or USB all work. Then import it there (see below).
Converting a shapefile to DXF or CSV
- Import the zipped shapefile in Points/Files.
- Export it as DXF, or as any of the CSVs.
Loading into Emlid Flow
- Create the Flow project in the same coordinate system and units.
- Swipe up the project drawer and tap Import, then choose the format [5].
Loading into Trimble Access
7 · OPUS: static RINEX to a control point
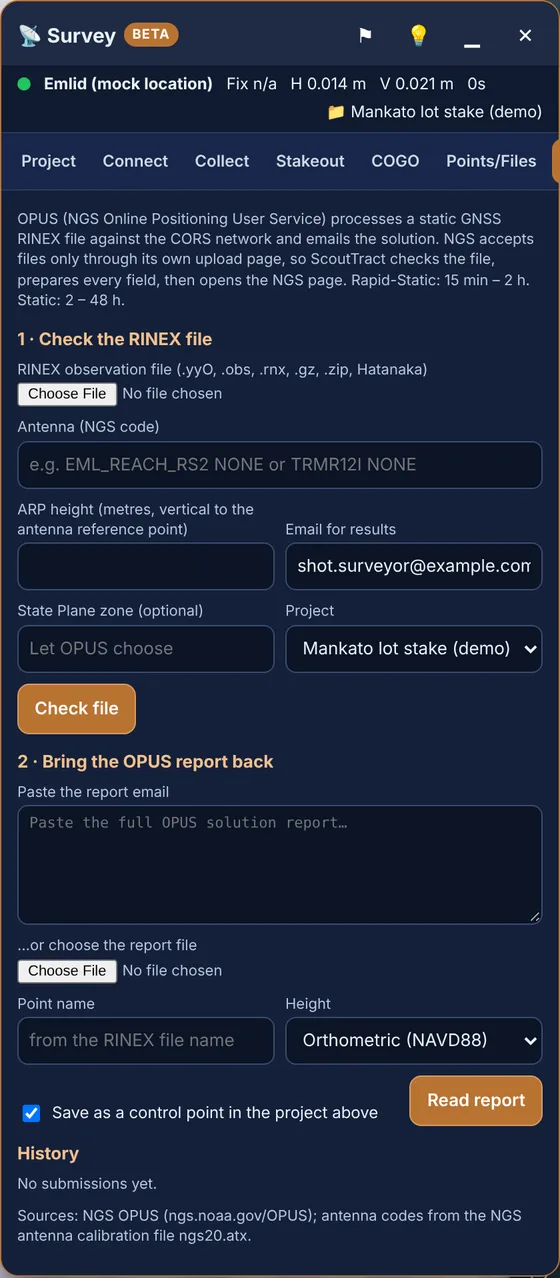
Tip: OPUS is easiest on the computer. The RINEX file is usually there after you download it from the receiver, and you can keep the NGS page open in another tab.
Limitation: ScoutTract doesn't log raw GNSS observations or RINEX. Mock location and NMEA carry positions only. Record the static file on the receiver, then bring it here to check.
Emlid:
- In Emlid Flow, go to Logging → Recorded logs and settings → ⚙.
- Choose the OPUS preset with RINEX 3.03.
- Enter the height to the bottom of the receiver.
- Tap Start recording. Emlid suggests at least 4 h for best accuracy.
- Tap End recording, then download the file [6].
UBX logs can be converted in Emlid Studio. For OPUS, use a 30 s interval, time rounding and GPS only [8].
Trimble: log static data on the receiver and convert it to RINEX in your office software.
1 · Check the RINEX file
- Choose the file. Accepted: .yyO, .obs, .rnx, .gz, .zip or Hatanaka.
- Enter the Antenna (NGS code), e.g.
EML_REACH_RS2 NONE(RS2+:EML_REACH_RS2+ NONE; RS4:EML_REACH_RS4 NONE) orTRMR12I NONE[7][14]. - Enter the ARP height in metres: vertical from the mark to the antenna reference point. On a Reach, that's the bottom of the receiver [4].
- Fill in Email for results, an optional State Plane zone and the Project. Then tap Check file.
ScoutTract checks:
- the duration: 15 min–2 h → OPUS-RS; 2–48 h → OPUS-S;
- midnight crossing and the logging interval;
- L1/L2 dual frequency (NGS requires dual-frequency GPS) [13];
- the antenna, the height and the file size.
When the file passes, ScoutTract shows ✓ Ready for OPUS-RS/OPUS-S with Copy buttons.
- Tap Open NGS OPUS upload ↗.
- On the NGS page, enter the data file, antenna, antenna height and email.
- Press Upload to Rapid-Static or Upload to Static [13].
2 · Bring the OPUS report back
- Paste the report email, or use …or choose the report file.
- Set the Point name and the Height: Orthometric (NAVD88) or Ellipsoidal.
- Keep Save as a control point in the project above ticked, then tap Read report.
ScoutTract checks the report against NGS guidance:
- more than 90% of observations used;
- more than 50% of ambiguities fixed;
- RMS under 3 cm;
- peak-to-peak under 5 cm.
It shows ✓ Solution meets NGS quality guidance or ! Review this solution. The saved point gets code OPUS and the type Control. NAD83 projects use the NAD_83 coordinates and WGS84 projects use ITRF. Mark each upload in History with Mark submitted.
Please note: NGS is modernising the NSRS. Its page sets a deadline of 13 Jan 2027 for OPUS Projects and levelling submissions to the current datums. Regular OPUS uploads aren't affected by that notice [13].
8 · Troubleshooting
| What you see | Try this |
|---|---|
| Elevations off by ~0.09–0.15 m (Reach) or by the pole height | Wrong receiver model or antenna-height setting, or the height is set in two places. See sections 3 and 4, then use Check in on known point. |
| Elevations off by ~30 m | Elevations is set to the wrong type: ellipsoidal vs NAVD88. Match your deliverable. |
| Import lands in the wrong place | Check Coordinates (grid vs lat/lon), File units, the PNEZD vs PENZD order, and that the shapefile .zip has its .prj. |
| Emlid Flow rejects the CSV | Use CSV — Emlid Flow with Flow's CSV import, or PNEZD with Flow's PNEZD import. |
| OPUS check fails | Single-frequency data, an interval OPUS doesn't accept, or a file under 15 min or over 48 h. For Reach, re-convert in Emlid Studio (30 s, GPS only). |
| Something else | Tap ⚑ in the Survey header to report a problem. It goes to the ScoutTract team. |
9 · Office prep checklist
Project
- Project created: right State Plane zone (NAD83(2011)), units
- Same zone, units and geoid planned in Emlid Flow / Trimble Access / CAD
- Control imported as Control; targets as Stake targets
- Import checked: grid vs lat/lon, file units, PNEZD vs PENZD
- Shapefile .zip includes its .prj
Computations
- Record traverse keyed in; misclosure and precision acceptable
- Computed corners stored (Store result points)
- Area & perimeter checked against the record
Files for the field
- ScoutTract on the phone: same project opens after sign-in
- Emlid Flow: CSV — Emlid Flow, DXF or Shapefile exported and copied
- Trimble Access: CSV — P,N,E,Z,Code, DXF or Shapefile; coordinate order matches
After the field
- Stake report CSV downloaded and reviewed (horizontal miss, dZ)
- Check-in report: every check-in PASS
- OPUS: RINEX checked, uploaded, report read, control point saved
- Exports downloaded for CAD and records
The field checklist (receiver, mock location, antenna height, check-in) is in the Mobile edition.
Sources (checked 2 Nov 2026)
- Emlid, "Getting Reach coordinates on Android via BT" (Reach RS2/RS2+). docs.emlid.com/reachrs2/integration/mock-location/
- Emlid, mock-location guide for Reach RS3. docs.emlid.com/reachrs3/integration/mock-location/
- Emlid, RTK over NTRIP (RS2: docs.emlid.com/reachrs2/rtk-quickstart/ntrip-workflow/; RS3: …/reachrs3-as-rover/rtk-over-ntrip-service/)
- Emlid, "How to set up antenna height for RTK". docs.emlid.com/reachrs2/rtk-quickstart/antenna-height-rtk/
- Emlid Flow, "Create or import project". docs.emlid.com/emlid-flow/setting-up-team-and-projects/creating-project/
- Emlid, "How to log data for OPUS". docs.emlid.com/reachrs2/ppk-quickstart/how-to-record-and-download-logs/opus-logging/
- Emlid, "NOAA's OPUS" workflow. docs.emlid.com/reachrs2/base-setup/determining-base-position/online-post-processing-services/opus-workflow/
- Emlid Studio, "Convert to RINEX". docs.emlid.com/emlid-studio/convert-to-rinex-workflow/
- Trimble Mobile Manager help, "Location sharing with other apps". help.fieldsystems.trimble.com/trimble-mobile-manager/location-sharing.htm
- Trimble Mobile Manager help, "Get started". help.fieldsystems.trimble.com/trimble-mobile-manager/get-started.htm
- Ultimate Positioning Group (Trimble dealer), "Location Sharing". help.upgsolutions.com/hc/en-au/articles/7494420755087
- Trimble Access help, "Point and line files". help.fieldsystems.trimble.com/trimble-access/latest/en/data-files-points-lines.htm
- NGS, OPUS upload page. www.ngs.noaa.gov/OPUS/
- NGS, antenna calibrations file ngs20.atx (G01 north/east/up, radome NONE): EML_REACH_RS2/RS2+/RS3 134.92 mm, RS4/RS4P 93.72 mm, RX 147.08 mm; TRMDA2 53.66, TRMR2 91.16, TRMR10 128.36, TRMR10-2 128.64, TRMR12 128.75, TRMR12I 129.32 mm. geodesy.noaa.gov/ANTCAL/ (files.ngs.noaa.gov/pub/antcal/)
- Trimble Mobile Manager help, "Configure the antenna height". help.fieldsystems.trimble.com/trimble-mobile-manager/antenna-height.htm
ScoutTract Survey is in Beta. Results depend on your receiver, corrections, datum and setup. This guide doesn't replace your field software's QA or a licensed surveyor's judgement.